|
|
|
Fall Art Ideas
Fall Finger Paint Fun
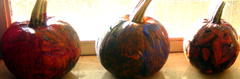
(Photo submitted by Shell)
Finger-paint on
bumpy corn or a smooth pumpkin.
A Fall Tree
Give children red, green, gold,
yellow, and orange crayons and a
piece of white paper. Let them use the colors to draw a fall
tree.
OR
Cut trees out of poster board - one for each child, then
go for a walk, collect leaves and glue them on your trees.
Fall Leaf Stained Glass Designs
Materials Needed:
Colorful fall leaves,
wooden ice cream sticks, paper towels, old
crayons pieces, waxed paper, paper clips, kitchen towel, iron,
tape
Directions:
Take your class on a walk
outdoors and collect 4 or 5 fall leaves. Give each child a ice
cream stick,
paper towel, and some pieces of old crayon. Ask each child to
make crayon shaving over the paper
towel by scraping the side of the ice cream stick against the
crayon. Each child should make a
handful of shavings. Next, give your child 2 12"long pieces of
waxed paper. Children will then arrange
their fall leaves on one of their pieces of waxed paper. have the
children sprinkle colored wax in the
spaces between the leaves. Ask each child to lay a second piece
of waxed paper on top of his or
her leaf arrangement. Use paper clips to attach each child
pieces of waxed paper together.
Place a towel over the paper, to protect the iron. then set the
iron at a low temperature
and iron each child arrangement. Then display in the window!
Fall Tree
Cut a sheet of
construction paper to fit around a coffee can. Have your children
decorate the paper with crayons, markers, or stickers. Tape the
paper to the can.
Fill the coffee can with sand and then stand a branch in it.
Help the children cut
or tear fall symbols from magazines and advertisements. Tape a
loop of yarn to
each shape. Unbend some paper clips and show your children how
to hang the shapes
from the branch. Leave the decorated tree in your room
throughout the fall season.
Leaf Rubbing
To help children notice the
veins in leaves and the different shapes of leaves, let them place
a
variety of leaves (bottom side up) under a piece of light colored
construction paper. Using the sides
of crayons that have had the paper covering removed, children make
crayon rubbing of the leaves.
Finger Tree
Gather colored paper (red,
orange, brown, green, yellow) Trace the child's hand onto several
sheets of several colors. Cut out. Then cut out a brown tree
trunk&branches in proportion
to the amount of leaves. Have the child glue the hand shapes to
the tree trunk to form the leaves
of the tree. Option: Have the child think of things to be
thankful for and label the hand/leaves.
Leaf People
Let the children gather large leaves (or cut
leaves from construction paper). Have the
children decorate the leaves with facial features, arms, and legs
to create leaf people.
Leaf Mobile
Glue colorful
and different fabrics to both sides of several pieces of heavy
paper.
Cut leaves from this. Tie a string on each leaf. Suspend the
leaves from a small branch.
Hang where the leaves will catch the breeze and flutter.
Pumpkin Faces
Encourage the children to draw faces on a
pumpkin w/ washable markers or crayons.
Aluminum Foil Leaves
Pieces of aluminum
foil, leaves, glue, construction paper Set out pieces of aluminum
foil and a variety of fall leaves. Let each child select a leaf,
place it under a piece of foil,
and gently press and rub the foil with his or her hand to get a
leaf print.
Then have the children glue their leaf prints to the construction
paper.
Handprint Fall Tree
Need small amounts
of assorted fall colors and tempera paint the palm
and inside of fingers of one hand (excluding the thumb) with brown
paint press hand on
the paper so that the palm forms a trunk and the fingers form
branches dip pad of
thumb (thumbprint) in paint, one color at a time and stamp leaves
onto the branches
Fall Face Picture
Materials Needed:
White paper, glue, leaves, markers or crayons
Directions:
Cut a 41/2" circle out of white paper. Have children glue circle
on construction paper.
Ahead of time collect a variety of leaves. Let children glue
leaves on circle for hair.
Use markers or crayons to add the facial features. You can also
make a leaf collage.
Pressed Leaves
Materials Needed:
Leaves, wax paper, crayon shavings, cloth or a towel, and an Iron
(Adult only)
Directions:
Have the children collect autumn leaves in various colors. They
arrange the leaves on a square
piece of wax paper, along with colorful crayon shavings. Place
an identical piece of wax paper over it.
An adult places the square between two pieces of cloth and iron
to seal the papers together.
Leaf Wreath
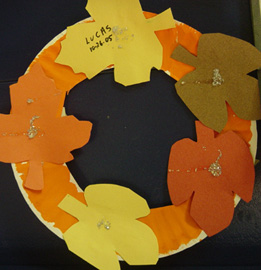
(Submitted by Ana)
Using stencil, have
the children draw leaves onto fall colored construction paper
(red, orange, yellow, and brown). Have the children cut out
their leaves. Paint the
outer edge of a paper plate orange.. cut out the center. When
dry, let the children
add their leaf cutouts to the wreath and add gold glitter for a
sparkly look.
Leaf Painting:
Go for a walk and
have each child choose 2 special leaves. Then come back in
(or stay outside) and paint with tempera paints using the leaves
as brushes. Ideally,
each kids will use each leaf for one color, and will end up with
a 2-color painting.
So, painting on leaf-colored construction paper works well.
(Provide the children
with brown or red paper, and offer yellow, green, and orange
paint, etc.)
Leaf Prints
You will need the
following items: Newspaper, leaves, tempera paint
(red, orange, yellow), paintbrushes, black construction paper.
Have the children select one or two leaves and place them on a
piece of newspaper.
Let them paint their leaves red, yellow and orange. Then help
each child place a
sheet of black construction paper over the painted leaves and
gently press down
to make a print. You can keep doing this until you put as many
leaves on the black
paper as the child wants to fill up the page. The kids really
enjoy doing
this one and so does the teacher. I always make one for myself.
Dried Leaf Art
Materials Needed:
A cut out leaf from colored paper, Dried leaves, Glue, and a
Paint brush
Directions:
Provide a large leaf cut from colored construction paper. Set out
bowls of dried fall leaves
and have the children brush glue on their leaf shapes and then
sprinkle with the dried leaves.
Crayon Rubbings
Make crayon rubbings
of pumpkins, corn cobs, leaves, etc.
Leaf Bracelets
Wrap a piece of
masking tape (sticky side out) around each child's
wrist. Go on a nature walk and have children collect one leaf from
each of several trees,
sticking it on their leaf bracelet. When the class returns, sit
in circle. Teacher holds up
each leaf shape in turn and lets children identify similar leaf
on their bracelets.
Let children wear their bracelets home and check the types of
leaves in their yards.
Cornstalk & Gourd Prints
Dip cornstalks &
gourds in paint & use them to make prints on paper
Cornstarch Impressions
Cornstarch, baking
soda, water, saucepan, waxed paper, nature objects
such as leaves, twigs and flowers:
In a saucepan, mix together 1 cup cornstarch, 2 cups baking soda,
and 1 1/4 cups water.
Cook over medium heat until the mixture thickens. Cool, then
flatten mixture between sheets
of waxed paper. Let the children lay leaves, twigs, flowers or
other nature objects on top
of the cornstarch mixture and press them down firmly. Then have
them remove the
objects to see the detailed impressions they made.
Puzzle Tree
You know those
puzzles that seem to always have missing pieces (like the 63 piece
one
that only has 40 pieces left ) Cut out the trunk of a tree with
limbs glue this or even staple
it to another piece of paper and glue the puzzle pieces to the
branches of the tree.
Pre-K Fun Theme Pages are
for educational reference only!
No copyright infringement is intended.
I do not claim any of these as my own ideas.
They are shared from friends and fellow group
members.
Thanks for sharing all your great ideas!
|
|