Leprechaun
Footprint Card
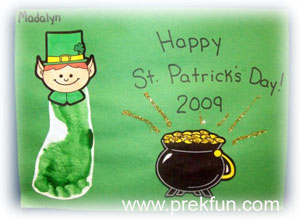
(Photo submitted by Shell)
Let the children dip
one foot in green paint to make a footprint onto white
construction
paper. Let dry. Then give the children a leprechaun head cutout to
attach to the heel of
their foot painting. Glue this and a pot of gold cutout or a rainbow
onto a green piece of
construction paper to create the card. The leprechaun and
pot of gold cutouts can be
found on the St. Patrick's Day printable pages....
HERE.
Green Paint
Let the children
paint with different shades of green paint.
Blarney Stones
Celebrate St.
Patrick's Day in a fun, easy, & inexpensive way. Have the kids
gather
smooth rocks from outside. Wash and dry the rocks, then use a
paintbrush to cover
rocks with white glue. Dip each of them in green or gold glitter
and let dry. You now have
Blarney Stones for good luck! The kids just love the sparkle---&
the fact that they made them!
Leprechaun
Wind Dancers
Have each child glue
a black construction paper band to a green leprechaun hat cutout.
Then have him/her glue a yellow shamrock cutout to the band and
print his/her name
on the hat's brim. Give him/her six crepe paper streamer lengths
- one in each color
of the rainbow - to glue to the back of the hat cutout.
Blend A
Rainbow
Drop spoonfuls of
red, orange, yellow, green, blue, and purple fingerpaint onto a
large
sheet of white paper. Be sure the drops of paint are in a line
and close together. Cover
the paint drops with a large sheet of waxed paper; then press and
rub the paint so that
the drops blend into one another. When the paint is dry, peel
away the waxed paper and then cut out the rainbow.
Pot Of Gold
Materials Needed:
8-10 iridescent yellow pom poms
yellow curling ribbon
green tissue paper
small baby food jar
white craft glue
water
scissors
paint brush or sponge applicator
M&M's, Skittles or other colorful small candies (optional)
Directions:
Thoroughly wash and dry small baby food jar and lid. Mix 4
tablespoons of white
craft glue with enough water to bring it to painting consistency.
Have children
cut tissue paper into squares. Starting with small sections,
apply glue mixture
with paint brush or sponge applicator to jar. Stick tissue paper
onto glue
mixture and continue all the way around the jar. Apply glue
mixture over the top
of tissue paper layer. Apply a second layer of tissue paper,
allow to dry completely.
While jar is drying, apply glue around the outer edge of the jar
lid. Adhere the ribbon
around the lid lip and tie in a knot. Curl the ribbon by sliding
the flat edge of the blade
from a pair of scissors along the ribbon. Glue pom poms to the
top of the lid and allow to dry.
When jar and lid are completely dry, fill jar with colored candies
and give to the lucky
recipient! Attach a cute note such as "Kiss me. I'm Irish!" or "A
Lucky Pot of Gold for You!".
Marble Paint
Green
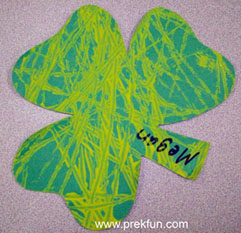
(Photo submitted by Shell)
Place a shamrock
cutout in a shallow box. Place a dab of white, green,
and yellow paint inside the box. Let the children drop in 3 marbles
and roll the marbles
around in the box by holding the box sides with both hands. Remove the
shamrock cutout and let dry.
Leprechaun
Puppet
Find a St. Patrick's
Day greeting card that has a picture of a leprechaun
on the front. Cut out the leprechaun picture and let your child
decorate
it by gluing on gold glitter. Tape a plastic straw to the back of
the picture for a puppet
handle. Then encourage your child to use his puppet for telling
leprechaun stories
Leprechaun
Puzzle
Draw a leprechaun
pot on green construction paper. Cut pot into 4 pieces.
Have child(ren) put back together like a puzzle. Can be pasted to
another
piece of paper also, then glue "gold" to top of pot. (can be coins
cut from
gold paper, gold glitter glued to top, a rainbow, etc.)
Shamrock
Puzzle
Cut a giant shamrock
shape out of poster board. Then cut the shape into puzzle pieces,
one piece for each child. Mark the back of each puzzle piece with
a felt tip marker.
Set out small squares of green construction paper or tissue
paper, glue and cotton swabs.
Give each child a puzzle piece. Have the children use the cotton
swabs to spread glue
all over the unmarked sides of their puzzle pieces. Then have
them cover the glue with
the green paper squares to create mosaic designs. After the glue
has dried,
put the shamrock puzzle together on a wall or bulletin board.
Shamrock
Necklace
Each of your little
artists can use this shamrock necklace project as
an outlet for creative self- expression. To make a necklace,
decorate a
shamrock-shaped cutout with glue, glitter, sequins, colored rice,
or any
other art materials that you have on hand. If desired, cover the
shamrock
with Con-Tact covering and punch a hole near the top. Through the
hole,
thread a green ribbon or yarn, length, and tie the ends. You can
also add pcs.
of green straw to the necklace.
Rainbow
Bracelets
Cut out six
one-inch wide loops from paper towel tubes. Have each child paint
one loop in each of the colors of the rainbow - red, orange,
yellow, green, blue,
and purple. When the paint is completely dry, ask the child to
string the loops
(in any order) onto a pipe cleaner. Wrap the pipe cleaner around
his/her wrist and twist the ends together to secure the bracelet.
Green Glitter
Shamrock
Give each child an
outline of a shamrock.
Have him/her cover it with glue
and sprinkle with green glitter or paint it
green and sprinkle with salt or sugar.
Or if you can find the green cellophane
paper in the grocery store cut holes in the
shamrock and put cellophane behind it.
Green Glitter
Shamrock II
Set out green
tempera paint, brushes, and glitter. Give each child three white
paper plates. Let the children paint their paper plates green.
Then have them
sprinkle glitter over the paint. When the paint has dried, staple
each child's plates
together and attach a green construction paper stem shape to make
a shamrock.
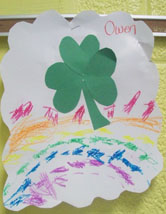
Tissue Paper
Rainbow
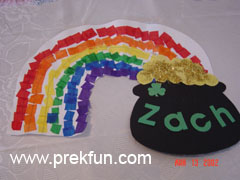
(Photo submitted by Shell)
For this project, I cut out small squares of
different colored tissue paper, the black pot, and yellow
construction paper circles for each child, beforehand. I
drew a rainbow shape outline on white construction
paper. Then the children cut their rainbow shape outline out and
drew pencil arcs to create the rainbow.
The pencil arcs assisted them with aligning the colored tissue paper
squares correctly. They glued on
their squares in order by color. We discussed using
ONE drop of glue for each little square so there
wouldn't be large clumps of glue. While this was drying,
they worked on their pot of golds by gluing the
circles onto the pot to form a mountain of gold. Then they
glued gold glitter onto their paper coins.
I also cut out letters for each of the children's names but they
had to find the letters that were in there
name among a huge pile of letters. Once they found the correct
letters, they glued them onto their
pot of gold. When everything was completely dry, we glued the
rainbows to the pots of gold.
Creating
Shamrocks
Give each of your
children a piece of white paper along with some green circle
stickers.
Show the children how to attach the stickers to their papers in
clusters of threes to
resemble shamrock leaves. Then let them use green crayons or
markers to add stems.
Variations:
Cut a shamrock from construction paper. Glue pieces of green
variegated
tissue paper or scraps of green paper on shamrock.
Decorate with crayons, felt-tipped pens, or paint.
Cover a shamrock with glue. Sprinkle with green glitter. Remove
excess.
Filter Paper
Shamrocks
Precut shamrock
shapes out of coffee filters. Mix water & yellow food coloring in
a small container. Do the same for blue. Have the children use
eyedroppers to drip
colors on the filter shape. The colors will run together & make
beautiful shamrocks!
Shamrock
Fingerprints
Set out green
inkpads and have your children make fingerprints on their papers
for
shamrock leaves by attaching the fingerprint clusters together,
similar to activity above.
Shamrock
Potato Prints
Trace shamrock
shapes onto potato halves and cut them out to make
shamrock stamps. Mix equal parts evaporated milk and liquid
tempera
paint. Pour this mixture over several layers of paper towels in a
meat tray.
Press the shamrock potato onto the pad and then repeatedly onto a
sheet of art paper.
The milk/paint mixture clings to the potato better than plain
paint, making it stamp better.
Shamrock
Collage
Purchase a variety
of green fabric remnants from a local fabric store. Then use
pinking
shears to cut the remnants into small squares. To make a
collage, dip the squares into
a mixture that is half water and half glue; then arrange the
scraps on a sheet of of white
construction paper so that they overlap. When the glue is dry,
use a permanent
marker to draw a shamrock outline on the fabric. Then cut out
the shamrock
and glue it to a green sheet of construction paper.
Crayon
Shavings Shamrock
Let children use
various colors of green crayons with the paper taken off to color
a
shamrock shape on a hot plate. the crayon melts as they draw.
when the entire shamrock
is covered I let them sprinkle gold dust on it. (gold glitter) I
display these in the window.
Green Whipped
Cream Finger Painting
Mix green food
coloring with a tub of whipped cream. When you open it, asked
surprised that it is green. Tell the class that the leprechaun
must have made it green.
Give each child a spoonful and let him/her finger-paint with it.
Clean up is easy, just lick!
Shamrock Magic
Wand
Materials Needed:
green construction paper
scissors
glue
stapler
gold glitter
green straw
thin ribbon in both green and gold
Instructions:
Cut three heart shapes from the green paper. Glue the tips of
the three shapes
together to form a shamrock. Staple the center of the shamrock
to the end of
the straw to make the handle. Decorate the shamrock with gold
glitter.
Cut three or more 3 foot ribbons. Hold the ribbons together and
staple
them to the back of the shamrock at the center so that the ends
hang down from the
shamrock magic wand. Cut several tiny shamrocks and staple them
along the ribbons.
Shamrock Wand
II
Materials Needed:
3 hearts, glue sticks, drinking straw,
green ribbon
Directions:
Invite the children to color their hearts green, cut them out.
Show them how to make
a shamrock by glue the hearts together. Add the straw for a wand
and green ribbon.
See The
Leprechaun?
Use green paint to
color a wooden craft spoon. When the paint is dry, glue on a
construction paper head, hat and feet. Wrap a piece of green
pipe cleaner around
the middle of the spoon to create two arms. Then use this lucky
little fellow as you
sing the following song. As you sing the last line, have the
children identify
the body part on which the leprechaun is standing.
(Sung to the
tune of: "Do You Know The Muffin Man")
Do you see the
leprechaun,
The leprechaun, the leprechaun?
Do you see the leprechaun?
He's standing on my (HAND)!
St. Patrick's
Day Holiday Card
The shamrock has
three leaves and looks like clover. It is the symbol of Saint
Patrick
and Ireland. Saint Patrick is said to have used the shamrock to
explain the idea of the
Holy Trinity to the Irish people. From green construction paper,
cut three 3-inch circles
and a 3 1/2-inch tall triangle with a 2 1/2-inch base. Fold a
sheet of yellow construction
paper in half. Overlap the circles on the front of the card and
add the triangle as a
stem to form a shamrock. On the inside write "The Luck of the
Irish to You!
Happy Saint Patrick's Day!" or a greeting of your choosing.
Leprechaun
Finder
Cut out two shapes that look like a
hand mirror. Take a piece of green cellophane,
sandwich it between the two mirror frames and glue. You can
decorate
the frame with glitter or stickers. Add the following directions:
How to use a leprechaun Finder
1. Be very quiet
2. When you hear a sound tiptoe toward it.
3.Look through the Leprechaun Finder.
4. Say "Leprechaun little, Leprechaun green. Come out where you
can be seen
Leprechaun
Bowlers
This is too cute!
Purchase enough sturdy (Chinet is one kind) paper bowls for each
child to have in. Have the children paint the outside with bright
green paint of the
bowls. After the bowls dry, punch two holes to loop sewing
elastic through to
keep the bowls on their heads. Glued on a feather and an orange
strip of felt or ribbon
just below the lip of the bowl. The kids will LOVE them---use
with an Irish music activity!
Shamrock Place
Mat
Invite your child to
make a place mat (or several mats) to use for St. Patrick's Day.
For each mat, let him fill a piece of white paper with shamrocks
by tracing
around a shamrock cookie cutter, using a green crayon or marker.
Also
give him a few shamrock stickers to attach, if you wish. To
preserve the mat,
cover it with clear Contact paper or have it laminated at a copy
shop.
Rice Shamrocks
Materials:
Oaktag or heavy white paper, rice, green food coloring, brushes,
glue, glue containers, paper towels or pie tins, shamrock
patterns.
Preparation:
Prepare rice a day ahead of project. Place rice in a small
amount
of water to which green food coloring has been added. Let it soak
until
desired shade of green had been reached. Drain off the water and
let rice dry
on paper towels or in pie tins overnight. Trace and cut out
shamrock shapes.
Have the children brush diluted glue on their shamrocks and
sprinkle green
rice over the glue.
(A drop or two of alcohol in a few drops food coloring will color
very darkly
any kind of pasta: macaroni, etc. Perhaps this will work with rice
too. It
dries much quicker without the water. )
Blarney Stones
Celebrate St.
Patrick's Day in a fun, easy, & inexpensive way. Have the kids
gather
smooth rocks from outside. Wash and dry the rocks, then use a
paintbrush to cover
rocks with white glue. Dip each of them in green or gold glitter
and let dry. You now have
Blarney Stones for good luck! The kids just love the sparkle---&
the fact that they made them!
Potato Prints
Cut a large potato
in half. You will need a cookie cutter that will fit on the potato
half.
Press the cookie cutter into the flat side of the potato. Then,
using a knife, cut the
potato around the outside of the cookie cutter, leaving a shaped
potato stamp.
Supply the children with the potato stamps, different colored
paints, and paper.
Have the children dip the potatoes in the paint and press them
firmly onto
the paper. If the potatoes are not cut evenly the shapes will not
appear clearly.
Bubble Wrap
Shamrocks
Give each child some
blue and yellow paint, and have them fingerpaint
on bubble wrap. Then, cover the bubble wrap with paper and use a
rolling pin or dowels to roll the paper on the bubble wrap (and
maybe
pop some bubbles in the process). Your shamrocks
will be green, and filled with many little circles.
Pre-K
Fun Theme Pages are for educational reference only!
No copyright infringement is intended.
I do not claim any of these as my own
ideas.
They are shared from friends and fellow
group
members.
Thanks for sharing all your great ideas!


.JPG)
.JPG)